Laboratory work №7. Large Language Models no. 1
Full API
- Python competencies required to complete this tutorial:
working with Transformers models;
working with HuggingFace datasets;
estimating result using metric;
making server for the chosen task using FastAPI.
Model pipeline contains the following steps:
Downloading the chosen dataset from HuggingFace.
Retrieving dataset’s properties.
Preprocessing dataset.
Retrieving model properties.
Get prediction for one sample from dataset.
Get predictions for the whole dataset.
Saving predictions.
Estimating results with metric.
Implementing server.
Motivation and purpose
In this laboratory work we will be introduced to Large Language Models and learn how to apply them to solve different tasks.
Large Language Model (LLM) - is a deep-learning algorithm that can perform a variety of Natural Language Processing tasks.
The life cycle of LLM encompasses several distinct phases, from its inception to deployment and potential retraining. However, let’s look at the two main phases:
Training - phase when model learns from a labeled dataset, adjusting its internal parameters (weights and biases) based on the input data and corresponding target outputs. The ultimate goal of training is to enable the model to generalize well to unseen data, capturing underlying patterns and relationships within the training dataset.
Inference - phase that occurs after the model has been trained and is ready to make predictions on new, unseen data. During inference, the trained model takes input data and produces output predictions without further adjusting its internal parameters.
Thus, training a model requires a huge corpus of text, usually hundreds of gigabytes of text collected from various sources. This process is complex, computationally intensive and time-consuming. At the same time, inference is less computationally intensive and its goal is to provide fast and efficient response to queries.
The primary purpose of this laboratory work is to learn how to apply LLMs to solve different tasks: Generation, Summarization, Classification, Natural Language Inference and Neural Machine Translation. We will not train models for the reasons outlined above, but rather we will make inferences.
Technical solution
Module |
Description |
Mark |
|---|---|---|
working with DataFrame |
4 |
|
loading dataset from HuggingFace |
4 |
|
machine learning framework |
6 |
|
library providing easy APIs to work with models |
6 |
|
getting model properties |
6 |
|
evaluating model performance |
8 |
|
implementing a WEB-service |
10 |
Important
torch module needs to be installed using
--extra-index-url https://download.pytorch.org/whl/cpu
in requirements.txt file.
Configuring model
Model behavior is fully defined by a configuration file that is called settings.json
and it is placed on the same level as main.py.
Config parameter |
Description |
Type |
|---|---|---|
|
Set up parameters for laboratory work |
|
|
Name of the the chosen model |
|
|
Name of the dataset |
|
|
Name of the metrics used for the chosen task |
|
|
Desired mark for laboratory work |
|
Assessment criteria
You state your ambitions on the mark by editing target_score parameter in
settings.json file. Possible values are 4, 6, 8, and 10. For example, 6
would mean that you have made tasks for mark 6 and request mentors to check
if you can get it. See mark requirements and explanations below:
- Desired mark 4:
pylintlevel: 5/10.The script downloads dataset and retrieves its properties.
- Desired mark 6:
pylintlevel: 7/10.All requirements for the mark 4.
The script preprocesses dataset, retrieves model properties and infers model on one sample from dataset.
- Desired mark 8:
pylintlevel: 10/10.All requirements for the mark 6.
The script infers model on the whole dataset and evaluates the model performance.
- Desired mark 10:
pylintlevel: 10/10;All requirements for the mark 8.
Implement model as a service.
Implementation tactics
Stage 0. Start working on the laboratory work
Start your implementation by selecting a model and dataset you are going to use. You can find all available combinations in the table.
Note
All logic for instantiating and using needed abstractions
should be implemented in a main() function of a start.py module.
To do this, implement the functions in the main.py module
and import them into start.py.
if __name__ == '__main__':
    main()
Note
You need to set the desired mark: 4, 6, 8 or 10 in the target_score field
in the settings.json file. The higher the desired mark, the more
number of tests run when checking your Pull Request.
Stage 1. Introduce importer abstraction: RawDataImporter
First of all, you need to import the chosen HuggingFace dataset.
To download your dataset inside your program you need to implement
lab_7_llm.main.RawDataImporter abstraction.
This class inherits from
core_utils.llm.raw_data_importer.AbstractRawDataImporter abstraction,
which has the following internal attributes:
self._hf_name- string with the name of the HuggingFace dataset;
self._raw_data- downloaded pd.DataFrame.
Important
To get data from RawDataImporter abstraction, use
core_utils.llm.raw_data_importer.AbstractRawDataImporter.raw_data property.
Note
Property is a method with a @property decorator
that can be accessed like a field.
See the intended instantiation:
importer = RawDataImporter(settings.parameters.dataset)
where settings.parameters.dataset is the name of the HuggingFace dataset
written in settings.json file.
Stage 1.1. Download dataset
Implement lab_7_llm.main.RawDataImporter.obtain() method
which allows to download dataset and fill self._raw_data attribute.
You have to use
load_dataset() function
from datasets module.
Important
In our laboratory work we are going to get predictions of the model,
so you have to download validation or test split of the
chosen dataset by filling the parameter split of
the load_dataset() function. Also for some datasets you need
to select a specific subset. You can always find out
if you need to do this in the appropriate task card.
Note
If downloaded dataset is not pd.DataFrame, method raises TypeError.
Note
obtain() method has @report_time decorator
which you will also find in many other methods
in this laboratory work. The purpose of this
decorator is to log time spent on method execution.
Stage 2. Introduce preprocessor abstraction: RawDataPreprocessor
Before putting the dataset into the model we have to analyze and preprocess it.
To perform all needed preprocessing and analyze your dataset
inside your program you need to implement
lab_7_llm.main.RawDataPreprocessor abstraction.
This class inherits from
core_utils.llm.raw_data_preprocessor.AbstractRawDataPreprocessor abstraction,
which has the following internal attributes:
self._raw_data- downloaded pd.DataFrame;
self._data- preprocessed pd.DataFrame.
Important
To get processed data from RawDataPreprocessor abstraction, use
core_utils.llm.raw_data_preprocessor.AbstractRawDataPreprocessor.data property.
See the intended instantiation:
preprocessor = RawDataPreprocessor(importer.raw_data)
where importer.raw_data is the property of the RawDataImporter class.
Stage 2.1. Analyze dataset properties
We will start with analyzing your raw dataset. In general, analyzing a dataset before loading it into the model allows you to understand its structure, data quality and identify potential problems such as missing values or outliers. This helps to better prepare your data, improve model performance and increase forecast accuracy.
Implement lab_7_llm.main.RawDataPreprocessor.analyze()
method which allows to analyze raw dataset.
Method should return a dictionary with the following dataset properties.
Name |
Description |
Type |
|---|---|---|
|
Number of samples in dataset |
|
|
Number of columns in dataset |
|
|
Number of duplicates in dataset |
|
|
Number of empty rows in dataset |
|
|
Minimal length of the dataset sample
in |
|
|
Maximal length of the dataset sample
in |
|
Note
Why find the maximum and minimum dataset sample length? If you are working with text, knowing the maximum sample length allows you to determine the maximum length of text your model can handle. This is important for correctly defining model parameters, such as the maximum length of the input sequence. While a minimum sample length may indicate the presence of incomplete or incorrect data.
Important
Before calculating minimal and maximal length of the dataset sample, drop empty rows in the dataset.
Stage 2.2. Demonstrate the result in start.py
Important
Stages 0 - 2.2 are required to get the mark 4.
Demonstrate your dataset analysis
in the main() function of the start.py module.
Stage 2.3. Preprocess dataset
Preprocessing the dataset before loading it into the model is an important step. Data cleaning, label coding and more contribute to the quality and efficiency of the model, allowing it to better extract patterns from the data.
Implement method
lab_7_llm.main.RawDataPreprocessor.transform()
which allows to preprocess dataset.
Important
You can find all needed preprocessing for your combination of model and dataset choosing appropriate task:
Note
According to preprocessing instructions in task cards,
you should change column names. To do this use fields of the
core_utils.llm.raw_data_preprocessor.ColumnNames abstraction.
Save your preprocessed dataset to self._data attribute.
Stage 3. Introduce dataset abstraction: TaskDataset
To work with the model we will use PyTorch
Dataset abstraction.
We convert pd.Dataframe to Dataset, because in the next step
we will use PyTorch DataLoader abstraction, which will allow us
to efficiently load the data into the model’s memory,
process it in batches and pass it to the model.
Implement lab_7_llm.main.TaskDataset abstraction
to convert pd.DataFrame to Dataset and override some methods.
This class inherits from torch.utils.data.Dataset abstraction,
which has one internal attribute:
self._data-pd.DataFramewith preprocessed data.
Important
When instantiating TaskDataset
abstraction in start.py module,
limit the full pd.DataFrame you got
from RawDataPreprocessor to the first 100 samples.
See the intended instantiation:
dataset = TaskDataset(preprocessor.data.head(100))
where preprocessor.data is the property of the RawDataPreprocessor class.
Stage 3.1. Get the dataset length
In the next two steps, we will override some methods
that will allow us to further work with PyTorch DataLoader abstraction.
Implement lab_7_llm.main.TaskDataset.__len__() method
which allows to get the number of items in dataset.
PyTorch DataLoader uses this method
to determine the total number of batches in an epoch.
Stage 3.2. Retrieve an item from the dataset
Implement lab_7_llm.main.TaskDataset.__getitem__() method
which allows to retrieve an item from the dataset by index.
PyTorch DataLoader calls this method to retrieve data for each batch.
Implementing this method allows you to define how the data is retrieved
from the dataset and how it is structured.
It should return a tuple containing items
from columns with text to be retrieved.
Depending on the task, the number of columns may vary.
Stage 3.3. Retrieve data
Implement lab_7_llm.main.TaskDataset.data property
which allows to access the preprocessed pd.DataFrame.
Stage 4. Introduce model pipeline abstraction: LLMPipeline
Now we are ready to run our model.
To initialize our model, analyze its properties,
infer model on the whole dataset and one sample from it you need to implement
lab_7_llm.main.LLMPipeline abstraction.
This class inherits from
core_utils.llm.llm_pipeline.AbstractLLMPipeline abstraction,
which has the following internal attributes:
self._model_name- a string with the model name;
self._model- the model instance;
self._dataset-Datasetinstance;
self._device- a string with a device type (cpu);
self._tokenizer- the tokenizer instance suitable for your model;
self._batch_size- an integer with batch size;
self._max_length- an integer with maximum length of generated sequence.
Note
When loading a model and tokenizer, you will import special
Auto Classes.
However, for some models and tokenizers you can use special classes
that are based on the architecture of the pre-trained model.
You can find out which class you need to use
through the architectures parameter of the model config object.
See the intended instantiation:
pipeline = LLMPipeline(settings.parameters.model, dataset, max_length, batch_size, device)
where settings.parameters.model is the name of the model
written in settings.json and dataset is an instance of TaskDataset abstraction.
Stage 4.1. Analyze model properties
Implement method
lab_7_llm.main.LLMPipeline.analyze_model()
which allows to analyze model properties.
Method should return a dictionary with the following model properties.
Name |
Description |
Type |
|---|---|---|
|
Represents the dimensions of the
input data of the model.
In our laboratory work it contains
batch size and maximum context length
of the model.
For example, |
|
|
Embedding size of the model |
|
|
Represents the dimensions of the
output data of the model.
For example,
|
|
|
Number of trainable parameters in the model |
|
|
Vocabulary size of the model |
|
|
Number of parameters |
|
|
Maximum context length of the model |
|
To get the part of the model properties, you have to use
summary()
method from torchinfo module.
This method returns an instance of ModelStatistics class.
For this lab you will need the following fields from this class:
input_size
summary_list
trainable_params
total_param_bytes
Stage 4.2. Infer one sample from dataset
Implement method
lab_7_llm.main.LLMPipeline.infer_sample(),
which allows to infer one sample from dataset.
Note
If the model is not defined, method returns None.
Stage 4.3. Demonstrate the result in start.py
Important
Stages 2.3 - 4.3 are required to get the mark 6.
Demonstrate model properties analysis and dataset sample inference
in the main() function of the start.py module.
As parameters for initialization LLMPipeline abstraction,
use:
batch_size= 1;
max_length= 120;
device= ‘cpu’.
Note
For generation closed QA task use max_length = 512.
Stage 4.4. Infer dataset
Implement method
lab_7_llm.main.LLMPipeline.infer_dataset(),
which allows to infer the dataset.
While iterating through dataset samples,
use PyTorch Dataloader.
It requires two parameters: dataset and batch_size.
The DataLoader class provides efficient data loading by allowing the user to load data in parallel using multiple CPU cores. This can significantly reduce the data loading time, especially for large datasets.
Note
When using tokenizer, set parameters
padding=True, truncation=True to handle varying sequence lengths.
Method returns pd.DataFrame with target and predictions columns.
Stage 4.5. Infer batch
LLMs typically work with datasets with thousands of samples. Consequently, iterating through these datasets one sample at a time proves highly inefficient, particularly when considering that each batch conceptually aligns with the inference on a single sample.
Also, you may have already noticed that
there is some duplication in methods
lab_7_llm.main.LLMPipeline.infer_sample()
and lab_7_llm.main.LLMPipeline.infer_dataset().
To be able to eliminate all aforementioned problems
first you need to implement method
lab_7_llm.main.LLMPipeline._infer_batch()
which allows to infer a single batch.
Note
There are going to be a few peculiarities when implementing method for generation closed QA task. You can find them in Generation.
Important
You have to rewrite infer_sample() and infer_dataset() methods
so that these methods use _infer_batch() method.
Stage 5. Introduce evaluation abstraction: TaskEvaluator
Now we have our predictions and can evaluate obtained result.
To be able to evaluate the performance of the model
with appropriate metrics you need to implement
lab_7_llm.main.TaskEvaluator abstraction.
This class inherits from
core_utils.llm.task_evaluator.AbstractTaskEvaluator abstraction,
which has the following internal attributes:
self._metrics- a field ofcore_utils.llm.metrics.Metricsabstraction with suitable metric;
self._data_path- a string with the path to thepredictions.csvfile.
See the intended instantiation:
evaluator = TaskEvaluator(predictions_path, settings.parameters.metrics)
where predictions_path is a string with the path to the predictions.csv file,
settings.parameters.metrics is the name of the suitable metric
written in settings.json file.
Stage 5.1. Evaluate model performance
Implement method
lab_7_llm.main.TaskEvaluator.run()
which allows to evaluate the predictions against the
references using the specified metric.
Note
To evaluate model performance using special metric you have to use
load() method from evaluate module.
Important
There are some additional parameters for Summarization task which you can find in Summarization.
Note
To compute the metrics you have to use
compute()
method from evaluate module.
Stage 5.2. Demonstrate the result in start.py
Important
Stages 4.4 - 5.2 are required to get the mark 8.
Demonstrate dataset inference and model performance evaluation
in the main() function of the start.py module.
Important
Set parameter batch_size = 64.
Note
After dataset inference you have to save
you predictions to predictions.csv file in start.py.
Stage 6. Implement Model as a Service
The next step after making an LLM pipeline is the implementation of a FastAPI service utilizing Transformers for the chosen task. Implementing a service allows to see how LLMs can be deployed and integrated into practical applications.
Note
For example, if you have chosen the NMT task, your service should accept sentence in one language and return translated sentence.
Important
All logic should be implemented in the following modules:
service.pyassets/index.htmlassets/main.jsassets/styles.css
Stage 6.1. Initialize core application
Let’s start implementing the service with initialisation
all needed instances for a pipeline and web-service.
To do this, implement
lab_7_llm.service.init_application() method.
Important
Remember, you have to implement your service using
FastAPI web framework.
To initialize the service, you need to create FastAPI instance
and a handler for statistical files from assets directory
where the implementation of the service interface will be stored.
Also, as parameters for initialization a pipeline use
values from Stage 4.3 and Stage 5.2.
Stage 6.2. Make root endpoint
Root endpoint is the base URL of your service, where start web page with user interface for the service will be located.
Some important points about user interface implementation:
Your start page should be made using Jinja templating engine in
assets/index.htmlfile;The request from the HTML page must be performed using JavaScript in
assets/main.jsfile. Then you will import it intoassets/index.htmlfile;CSS markup should be put in
assets/styles.cssfile.
Let’s look at the implementation of the request from the HTML page in a little more detail. The code of the request should be placed inside an event listener for the button click event. Specifically, you should call the asynchronous fetch() method.
Fill the options parameter of fetch() method with properties:
method- corresponding to the one inFastAPI;
headers- appropriate for sendingJSON;
body- containing aJSONrequest as a string.
The request’s JSON structure should match the
expected format in your FastAPI service
so that the query can be correctly processed.
So, an example of start page might look like this:
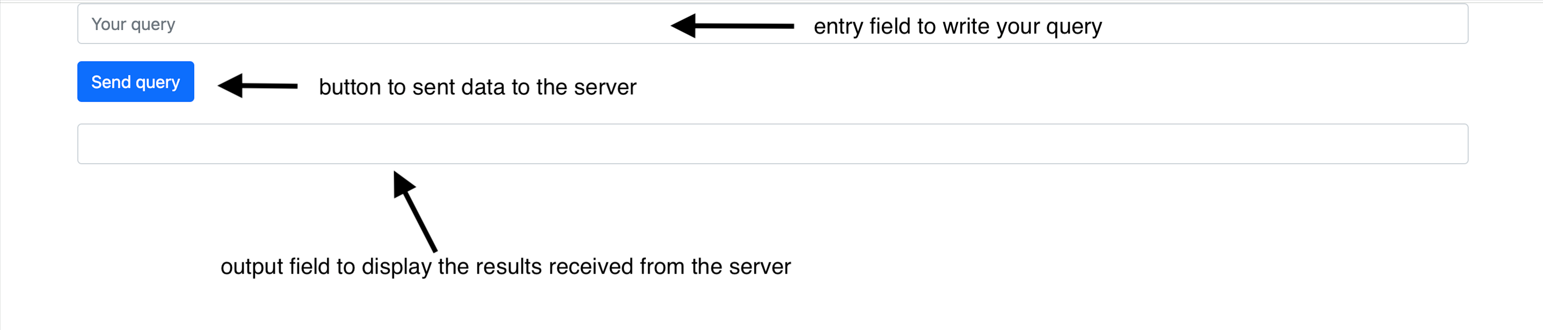
And now we are ready to implement
lab_7_llm.service.root() method
which allows to create a root endpoint of the service.
The method should return an HTML page using TemplateResponse
which renders an HTML page based on a specific template and passed data.
Before that you need to create a template using
Jinja2Templates with assets directory and
call lab_7_llm.service.init_application() method.
Note
Use @app.get("/")
decorator to create a route for the root URL.
Stage 6.2. Make main endpoint
When a user clicks the button on the start page, a POST request must be initiated to the main endpoint which is responsible for processing the data using LLM pipeline.
Implement lab_7_llm.service.infer() method
which allows to create a main endpoint for model call.
To make a query in an entry field you need to implement
lab_7_llm.service.Query abstraction
with question field which contains text of the query.
Use @dataclass decorator from pydantic module.
Response obtained as a result of the pipeline
will be displayed in the output field.
Response should be in the form of the dictionary
with infer key and the value containing response.
Note
Use @app.post("/infer")
decorator to create a route for the main endpoint URL.
Stage 6.3. Demonstrate the result
Important
Stage 6 is required to get the mark 10.
Demonstrate work of your service by running a server
implemented in service.py module and obtaining one sample inference result.
Note
You can run you server using uvicorn PATH:app --reload command,
where PATH is a path to service.py module.